What are Android Implicit Intent? How to create implicit intents in
android system? Android implicit intents example and explanation.
Implicit Intents are used to specify particular actions that your application is capable of doing and any application on the android system capable of that will be able to use your application and users will be able to choose which app they wanna use.
E.g. suppose your application is capable of sending photos.
E.g. suppose your application is capable of sending photos.
 |
| User wants to share a photo |
By default when users tap on the share option on their android phone they will either see the messaging screen asking them to enter the recipient’s
number or a couple of options like via messages or Bluetooth etc to
choose from.
 |
| When user taps on the share option he sees the above screen (Your app is not installed at the moment. |
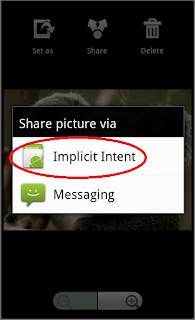
By using implicit intents you can enlist your application along with these message and Bluetooth options and whenever user wants to share a photo he can choose from one of these applications including yours.
 |
| After installing your app that uses implicit intents, now the user sees the above screen and can choose any option as he likes. |
How to create Implicit Intents in Android?
To create an implicit intent like I mentioned in above example, first of all you’ll have to make some additions in your AndroidManifest.XML file. When you open your manifest file you’ll notice a tag named intent-filter. This tag tells the android system what are the intentions of your application or rather a particular activity in your application e.g. for your main activity the intent-filter contains an entry mentioning that this activity should be launched when the application is launched.Modifying Manifest file -
So you’ll have to make entries for other implicit intents too. So create an intent-filter for your implicit intent and specify three things -
- An Action – what kind of action is your activity performing or rather what is your intent.
- A Category – what's the category of your intent.
- Data – type of data your application is capable of handling.
For our example of sending images following additions should
be done in AndroidManifest.XML file.
<intent-filter>
<action android:name="android.intent.action.SEND"
/>
<category android:name="android.intent.category.DEFAULT"
/>
<data android:mimeType="image/*" />
</intent-filter>
Put the above XML code
inside the activity in which you're enabling implicit intents just before the close of activity tag i.e. </activity> or if you want to enable the implicit intents for your entire app put the above xml lines after the main
intent filter in your AndroidManifest.XML file.
The above lines tell the android system that your application (or a particular activity in your app) can perform send operation and is capable of handling any type of image. So whenever users try to send an image, android system will automatically enlist your app along with other capable apps so that user can choose one.
The above lines tell the android system that your application (or a particular activity in your app) can perform send operation and is capable of handling any type of image. So whenever users try to send an image, android system will automatically enlist your app along with other capable apps so that user can choose one.
Creating a layout i.e UI and Writing the Code-
Now that you have modified your manifest file, it's time to get into the UI and coding part. First, create an ImageView in your main.xml file (or whatever’s
the name of your xml layout file for this activity) and write the following
code in your main java file just after you use the setContentView() method.
ImageView iv = (ImageView) findViewById(R.id.imageView1);
try{
iv.setImageURI((Uri) getIntent().getExtras().get(Intent.EXTRA_STREAM));
} catch(Exception
e){}
The first line here is used to get a reference to the
ImageView you just created in your main.xml file.
Note: Whenever you create an ImageView or any other UI element android system automatically assigns it an id. I used the automatically generated id i.e. imageview1 in the first line. If you want to change id of your ImageView feel free to do so but make sure to change it in the code too.
Next inside the try block we’re setting the image in that ImageView
to the image that user selected. The use of try-catch here is to handle errors that can occur when your app is opened directly without any image provided to it.
Let’s break the code inside try statement
further –
iv.setImageURI((Uri)
getIntent().getExtras().get(Intent.EXTRA_STREAM));
Here, iv is the object of ImageView referencing to our
ImageView and using setImageURI() method of android we’re setting an image
manually in that ImageView (iv). The setImageURI() method takes a URI as a
parameter and sets the image in the ImageView to that URI. Now to get the URI of the image that user wants to share we use the
intent.
The method getIntent() will return the intent. Then
using getExtras() method of Intent class we can get all extra parameters that are passed along with
the intent. Here only image is passed so using get(Intent.EXTRA_STREAM) we retrieve the image from the intent and then we need to cast the returned value to URI and
pass it to the setImageURI() method and finally we're setting the image inside the ImageView.
This example is as simple as it can get and aimed just to show you how implicit intents can be used to enhance your app.


